


How to make chocolate bean-to-bar
I have been in the chocolate industry for about 20 years, first as a chocolatier then as a chocolate maker. Most people don’t realize that there is a big difference between chocolate makers and chocolatiers. When I opened my first store, I was a chocolatier; I bought chocolate chips from Guittard Chocolate then melted the chocolate, remolded, and added my own flavors- I could also be called a confectioner or candy maker.
I sold my store and began my deep love affair with Dandelion Chocolate in San Francisco as a chocolate maker, where I learned to make chocolate. Every day began with selecting, roasting, cracking, and grinding cacao beans. Chocolatiers don’t really know how to make chocolate and most chocolate makers do not know about confections and candies. It it two different and distinct industries.
Making chocolate from scratch, from the cocoa bean, is a very specialize skill that takes a lot of time and knowledge to master. Although I am sharing a step by step guide it will take several attempts for you to create a product that you are happy with.
Very important for you to understand before you begin your chocolate making journey:
- Anyone can make chocolate from any cocoa bean.
- Chocolate can be made from any variety of cacao and from any country.
- Most defects in cacao come from post harvest activities, not harvesting on time, not fermenting well, not drying well, or not storing correctly.
- Chocolate can be made with non-fermented cacao, badly fermented cacao, or well fermented cacao.
- After a cocoa bean is dried and packed, it can be used immediately or stored for many years, can be up to 5 years but can go longer.
- Chocolate can be made with roasted or unroasted cacao beans.
- You can use the entire cacao bean to make chocolate, including the husks, or you can use the nibs only. Although the husks can be toxic.
- You can make chocolate in 1 hour with a rough texture, or you can let chocolate process for 3 days for smooth texture. This is considering the most basic chocolate making machine, the stone grinder or melanger.
- Vanilla is not necessary to make chocolate, I strongly recommend not using it.
- The best and most awarded chocolates in the world are made with:
- Well fermented cacao that has been dried in the sun.
- Has rested in breathable sacks with no insect contamination for 3 months to 12 months before being processed into chocolate.
- Contains zero to minimal cacao husk.
- Has been roasted to an optimal temperature for that specific cacao.
- Is tempered and packaged well.
Here are some of the best chocolates if you want to know what high quality chocolate is:


To start making chocolate you will need some basic tools and machines- not necessary, but required if you want great chocolate. You can roast in your home oven and use a basic hair dryer to winnow. If you can only buy one thing to really get into chocolate making, this is the best, smallest, and cheapest machine on the market: Premier Wonder Grinder.
The Premier Wonder Grinder is referred to as a melanger, grinder, or wet grinder. This specific model is meant to grind spices, nuts, coconut, or cacao. They have several sizes and models, always updating for better results. The newer the model, the more expensive. They range from $150 to $250 usd. Capacity is 1 to 4 kilos. The blue is the oldest model and cheapest. It works well and I would suggest as your first machine if you are testing the waters. The brown color model follows and the most recent is the red model. The current models have now been modified especially for chocolate and renamed to Premier Chocolate Refiners. I have all three models and they have the same function- depends how much you want to spend.

Almost every chocolate maker has one of these melangers. Once they purchase bigger machines for bigger production, they keep these for testing sample beans or making small batches. I have 6 of these. Be very aware that these machines can get hot and can catch fire! I have been working with these for 6 years and mine have never caught fire. I follow these general guidelines: always watch and listen for any changes, change belts and parts once a month, open and clean machines once per month, only fill below the wheel, let rest in between batches, and install some type of off switch (I have not done this but know people who have).
Choosing your cocoa beans
Finding cocoa beans is easy, finding good cocoa beans is extremely difficult. A trusted source to buy cocoa beans is at Chocolate Alchemy or Meridian Cacao. Even though the price is higher than what you can find at a grocery store, it is worth it. Amazon.com has unroasted cocoa beans, but I guarantee they are second tier compared to MeridianCacao.com and Chocolate Alchemy.com. You can also visit a chocolate maker in your area or their website and beg them to sell you 3 kilos of cacao- this can cost about $20 US dollars per kilo but it will yield you about 30 bars, 50 grams each, 70% chocolate. If you can get them to sell you cocoa nibs, which is roasted cocoa beans with the shells removed, that would be nice also, but the price would probably double to $40 US dollars for a kilo. But is saves you the time of roasting and winnowing. Start with 3 kilos of beans to have enough to experiment with.
If you do not live in the USA and need to select cocoa beans, look for beans that meet these criteria:
- They look somewhat clean: no rocks, feathers, leaves, bones, seeds, etc. These things are commonly found on farms but you do not want it in your cocoa.
- They smell nice. Cocoa can have many aromas from grassy to vinegar to blueberries. So there is no recommendation of what it should smell like. Rather, make sure that it does not smell like mold, feces, wet dirt, farm animals, etc. The aroma should be pleasant and on the side of vinegar or acidity.
- They look the same color and size. Some cacao can be a mixture of varieties and harvests. This can make for a spectacular blend of cacao, like the famous Chuao cacao of Venezuela, or it can be a lazy and sloppy way of processing cacao. Not all cacao beans have to be the same size, it should be mostly the same size. Fermenting and drying large cacao beans with tiny cacao beans can make over-fermented and over dried tiny cacao beans and under-fermented and under-dried large beans. Huge color differences mean that the cacao was fermented and dried very differently. Below I will go deeper into this.
- Should not have too much visible mold. It is ok and normal to have some exterior mold, this is only on the husk and you will remove it when you winnow. You can still make great chocolate. But internal mold is never ok.
- Should be mostly in tact and not broken. It is normal to remove about 1% of broken beans or flat beans from your 60 kilo cocoa sack. But much more than that means there is a problem on the farm, either they are breaking the beans when opening the pods (which leads to incorrect fermentation), or they are breaking the bean when drying (which means insects can lay eggs inside), or they are breaking during travel (which means you will burn them when roasting). There is absolutely nothing positive about broken beans. They can carry insects, diseases, will burn during roasting, and may have not fermented well.
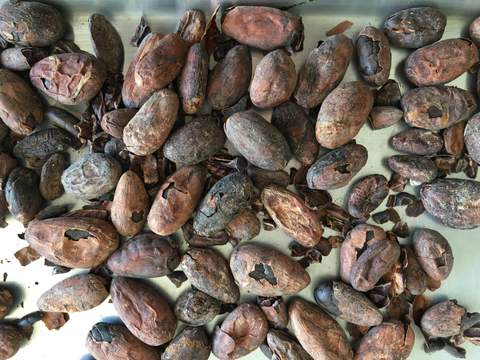
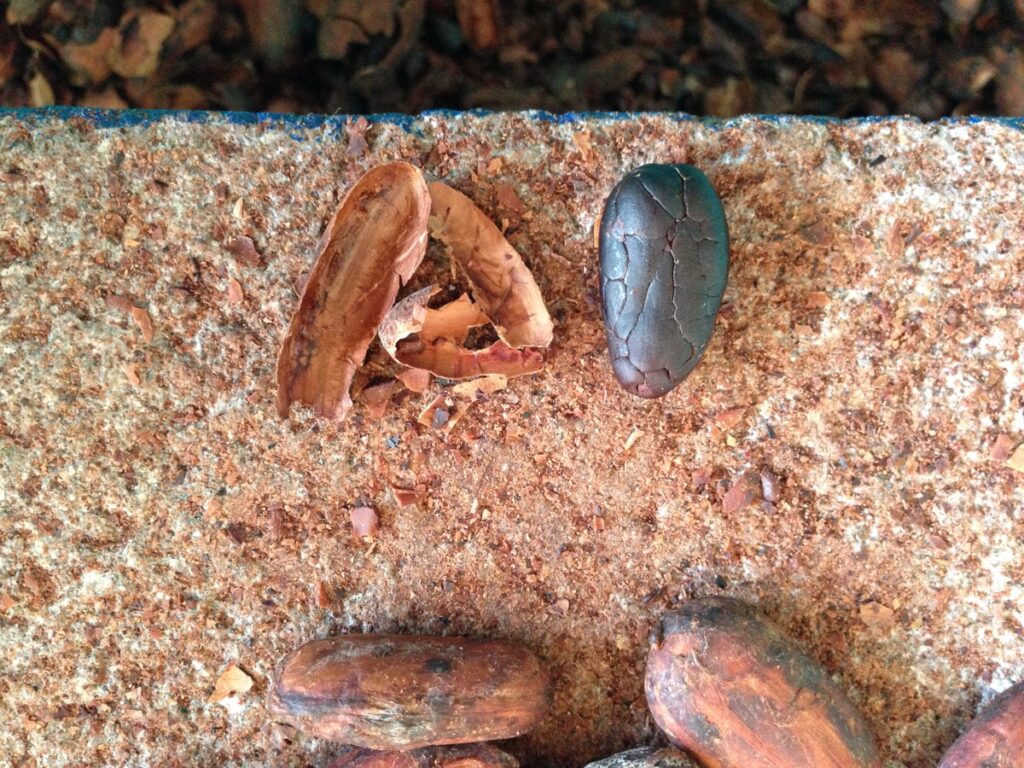
Below is an image of cocoa beans that were sent to me in the same sack, but clearly not the same batch, they were fermented and dried at different times. If I had to guess this was not even done by the same producer. I think the producer I bought from, bought fermented and dried beans from a nearby farmers and mixed theirs with his. This is common and can be ok if there is a standard to follow. The beans on the right are not fermented properly, you can immediately see this based on the smooth, clean, light color of the shell. Whereas the beans on the left, I would say are over fermented based on their dark color and flat shape. I do not even have to make a batch a chocolate with these beans to know that it will not produce good chocolate. The cocoa should look uniform.
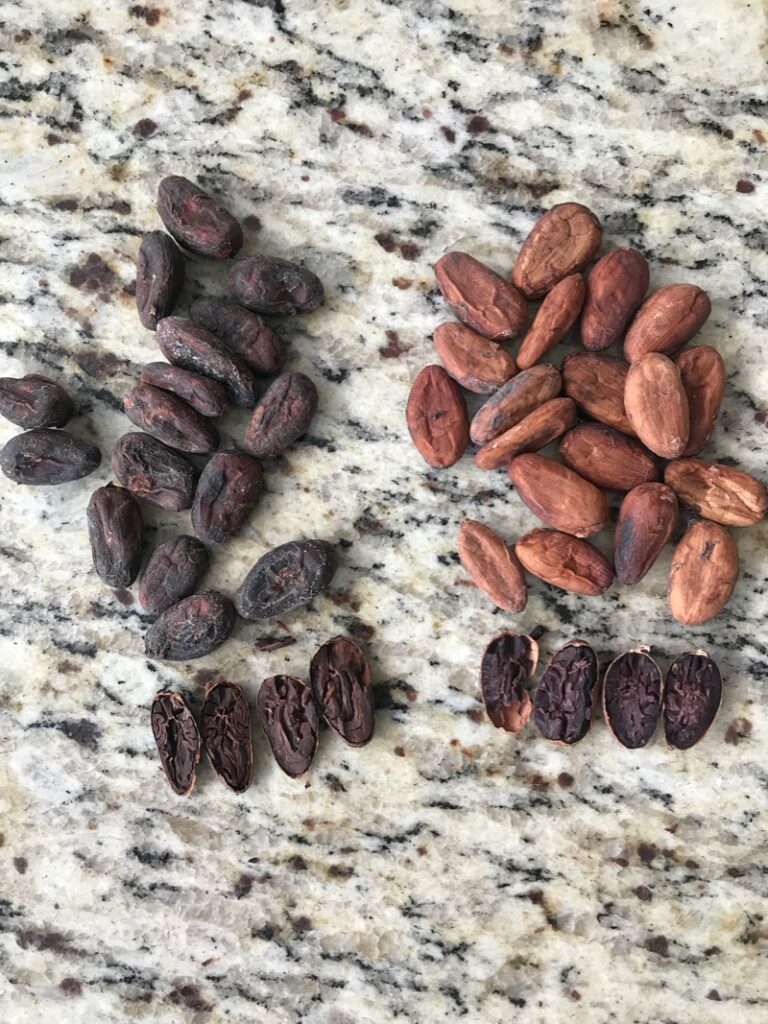
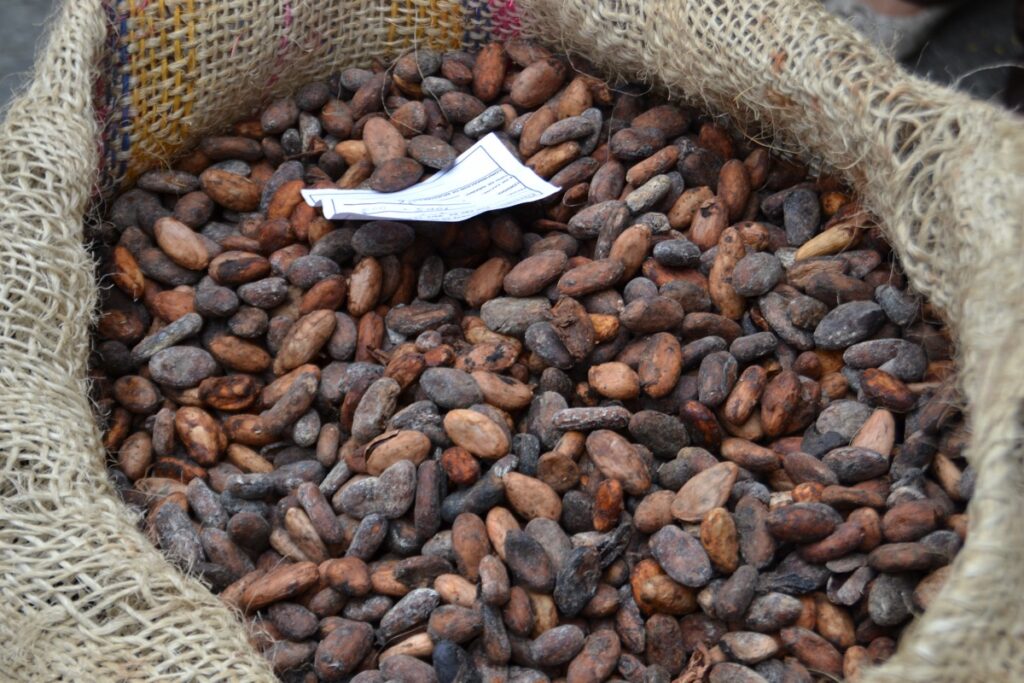
Image below shows some external mold, looks like white dots or white chalk, but when cut open they are ok. These pass the test, they would be ok to use if they met all the other quality criteria, which they do not.
External mold is ok, internal mold not acceptable.
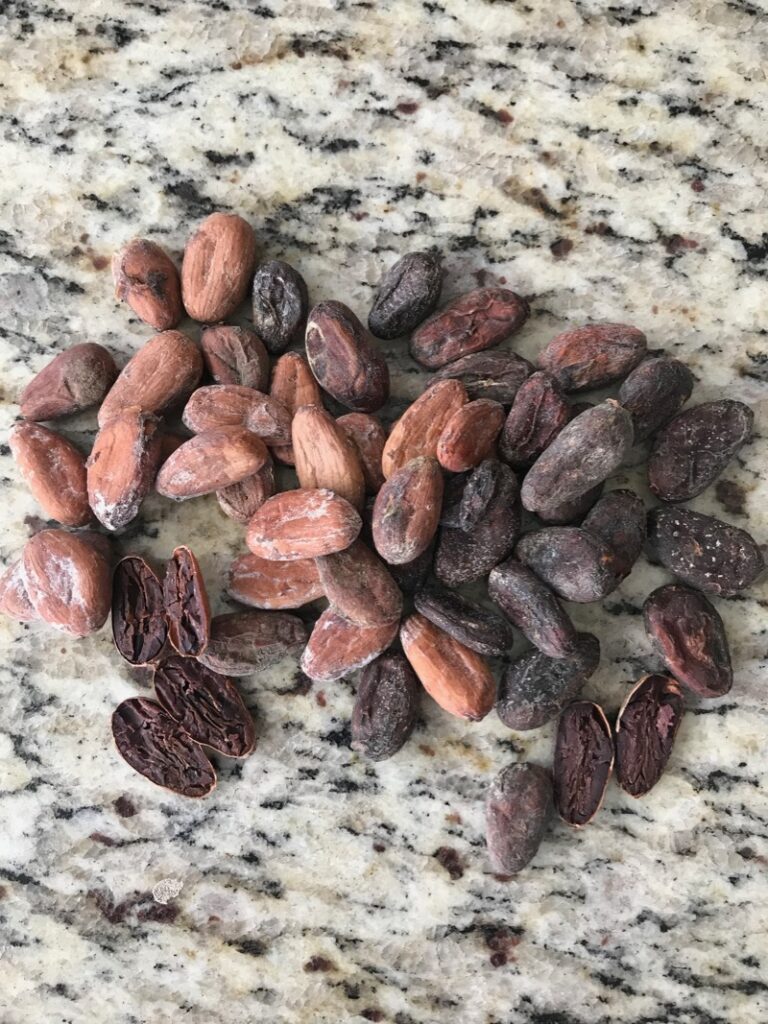
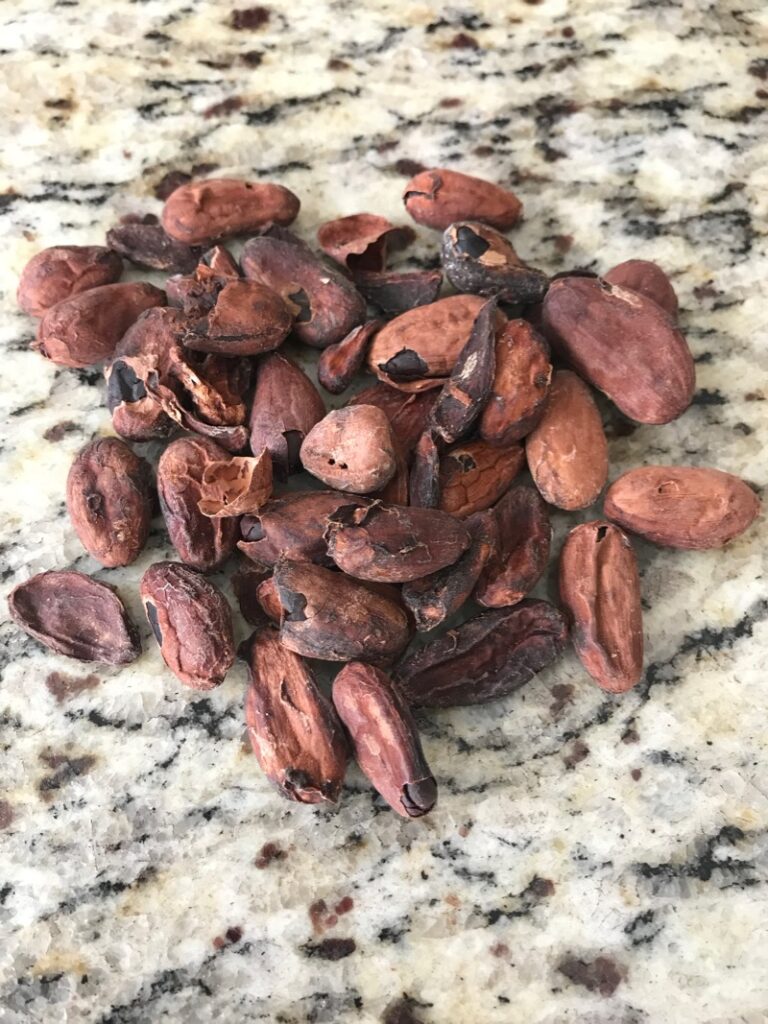
Image above showing broken beans, flat beans, cut beans … these I would not use to make chocolate. Reserve for making cocoa butter or for using to clean your machines the first time you use them.
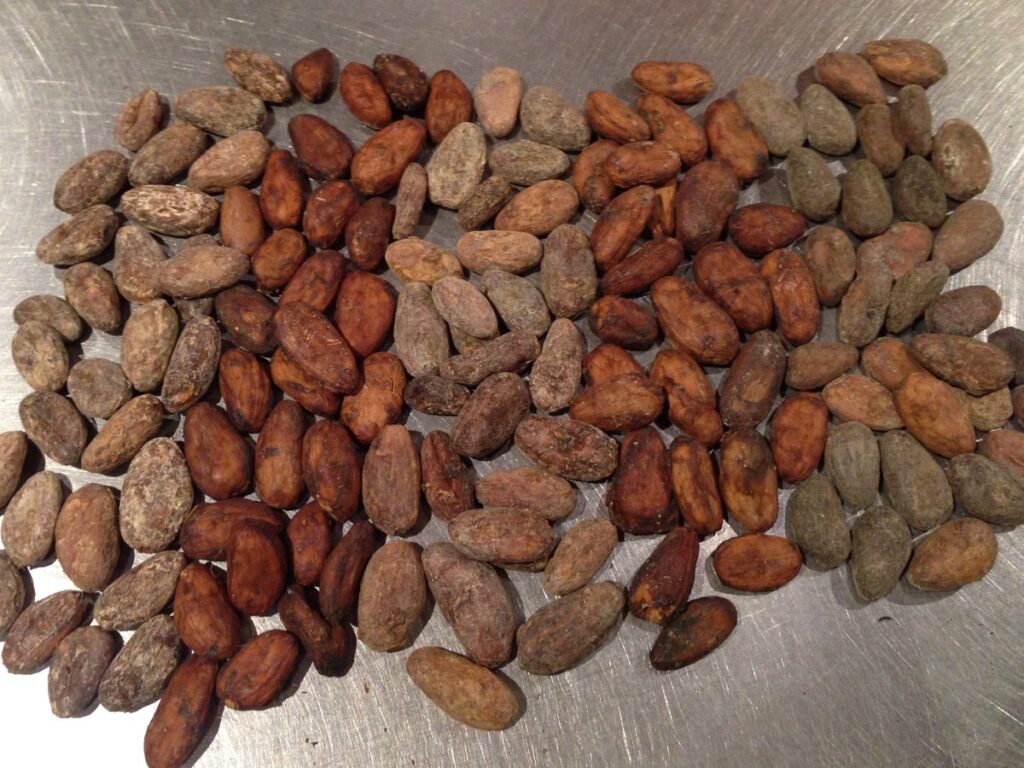
Below an image of perfectly fermented and dried cacao beans. These are 5 different origins, that is why they look different. But when you look at each origin, they look similar in color, similar in size, not too many broken beans or trash, and smell great. Beans from different origins do not need to look the same or be the same size. But the beans you get in one bag do.
Start making chocolate
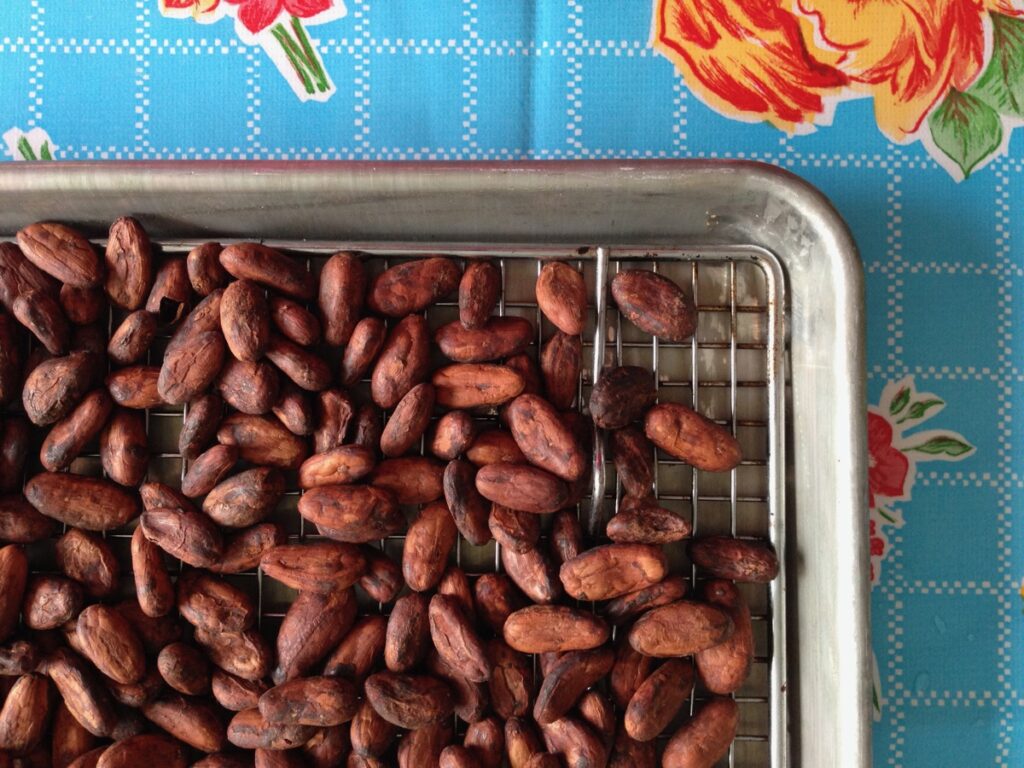
1. Clean the cacao beans. The image below shows the beans that will be removed when I roast the cacao. I remove the beans that are broken, stuck together, flat, or look like they might have mold. These beans did not ferment or dry correctly, will over roast, can carry unwanted bacteria, and will negatively affect your chocolate. There are many chocolate makers that include these beans in the batch, but I suggest you remove them. You can use them to clean your new machine (put them in and grind them after roasting), or you can use them to make cocoa butter.
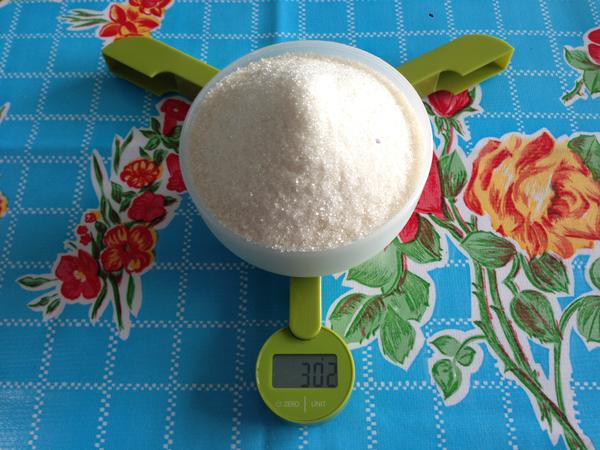
2. Decide what chocolate you will make. For my 70% chocolate bar I need 700 grams of cacao nibs and 300 grams of sugar. I will lose some of the cacao weight when I winnow (remove the husks), so I have to add extra cacao for the roast. In order to make sure I yield 700 grams of nibs, I will start with 1 kilo (1000g) of cacao beans. If you want to make an 80% chocolate bar, roast 1100 grams of cacao beans (to get 800g of nibs) and you would add 200g of sugar.
3. Choose a roasting method. You can roast in your normal home oven, a small oven, a small convection oven, in a small coffee roaster, on the stovetop in a pot or comal (griddle). Anything that heats to above 120c (248f) will work. The best chocolates are roasted in coffee roaster or convection oven. I place my beans on a half sheet pan with wire rack inside to help air circulate around the beans for more consistent roasting. You can also use a perforated sheet pan or a regular sheet pan.
4. Roasting time and temperature. Every chocolate maker has their own recipe for roasting temperature and roasting time; this is one factor that separates all chocolate makers. I roasted these beans for 35 minutes at 140c. With some practice you will figure out if you prefer light or dark roasts. With my Brazilian cacao beans from Bahia I aim to get the beans to reach the temperature between 125c and 135c. When I travel to work with indigenous communities, they roast until they hear the first beans pop; sounds like popcorn, which can be above 140c. There is no simple recipe for all beans. Ecuadorian cacao beans will be a different roast than Venezuelan cacao beans. And a 2014 harvest might be a different roast than 2015 harvest. There is no one recipe that will work for all beans when it comes to high end quality chocolate. A good chocolate maker working with different beans, will have a unique recipe for each bean. Maybe roasting their Venezuelan beans at 105c for 50 minutes and their Belizean beans roasting at 128c for 20 minutes. These are all tests you have to do.
In my convection oven I follow these guidelines:
Low roast: 100c to 120c, 20-60 minutes.
Medium roast: 120c-140c, 15-45 minutes.
High roast: 140c-160c, 15-30 minutes.
This is the temperature of the oven and since my oven is pretty precise, it closely mirrors the final temperature of the actual cocoa beans. Did you catch that? My oven temperature is almost the same as my cacao bean temperature. I use an infrared thermometer to measure the temperature of the beans. When I set my oven temperature at 130c within 15-25 minutes my bean temperature will be the same. This is very important to note. If you place your oven temperature at 130c and hope to get your beans to 130c within 20 minutes, and 30 minutes later the cocoa beans are 110c, then you need to adjust your oven temperature to maybe 150c to get the beans to 130c within your time frame.
There are also other techniques to follow: start at a high temperature, end at a low temp, start low and end high, start with oven off, or oven on. You have to figure it out for your beans depending what appliance you are using. The time and temperature I use in my convection oven would not work for my home oven, my coffee roaster. An infrared thermometer is nice for this step. An important thing to remember no matter how you roast; keep the cacao in motion as much as possible to prevent beans from burning and other beans from under roasting.
When you are finished roasting, remove from the oven and use a fan to help cool them down. A normal house fan can help do this. You want to cool the beans to STOP the roast. Cool them for about 15 minutes then let them sit for a minimum of 6 hours, 24 hours is ideal. The beans continue to release moisture for up to 6 hours after roasting. Do not place in a closed container, you have to let them breath for at least 6 hours. If you place in a closed container, you will see water accumulate then that water will get back into your beans.
Roasting challenging beans – basic things to remember:
- Great roasting cannot correct badly fermented, badly dried, badly stored beans. Nor can you remove bad aromas that might come from the farm or storage facilities: smokey cacao, rotten cacao, moldy cacao, etc.
- All cacao has some level of astringency and acidity. Roasting can help regulate but cannot make it disappear. Good chocolate can have astringency and acidity. It’s about balance.
- Highly astringent or acidic beans can be rested (unroasted) for several years to help them mellow out. Store in breathable plastic like GrainPro bags. It is also possible to rest the nibs or chocolate several months to help mellow out.
- You can make astringent beans into sweeter chocolate to help remove astringency. Like a milk, dark milk, or 50% to 60% dark. The added sugar, milk, and cocoa butter will help deceive the tongue to not notice the astringency as much.
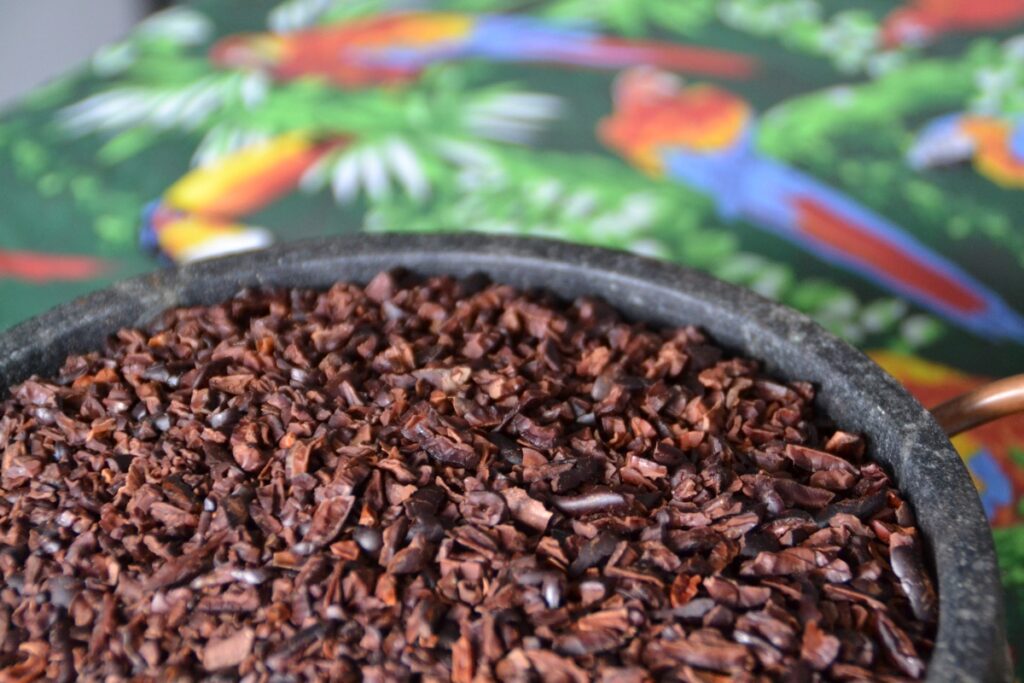
5. Cracking cocoa beans. Since I am only cracking 1 kilo of cacao, I put my beans on a rock (metate), and break them with another rock. You can also place the roasted beans in a towel and crush with a rolling pin, you can place in a plastic bag and crush with a wine bottle … the goal is to remove the husk from the nibs without cracking the nibs too much otherwise it will turn into powder. If you are familiar with a molino which is used to grind corn, this is ideal for cracking. I have included a list below of things that would work for this step.
In Mexico, women who prepare chocolate for ceremonies or special festivals will spend days hand peeling the beans. This is also another option and it avoids the next step of winnowing.
6. Winnowing. When you are done cracking, you will be left with a lot of husks with your nibs. The easiest way to separate these is to use a hair dryer. Place everything in a large bowl and point the hair dryer directly on the beans and the husks will blow away. Do this outside. You can also place the bowl near a fan and lift the cracked cacao, the fan will blow away the husks. John Nanci at ChocolateAlchemy.com sells small winnowers for beginners but if you are talented you can build your own with some plastic tubes. You can make chocolate with all the husks and nibs, but it will be more viscous than not using them since they don’t really contain any cocoa butter. Husks are also considered to be toxic unless you have tested them and they have been approved for consumption. Husks will also negatively affect the flavor and texture of the final chocolate. Also, if you will sell this chocolate; most countries have laws against a certain percentage of husks being in chocolate. Always best practice to remove husks.
It is OK to have small pieces of husks but try to remove the remainder with your hands.
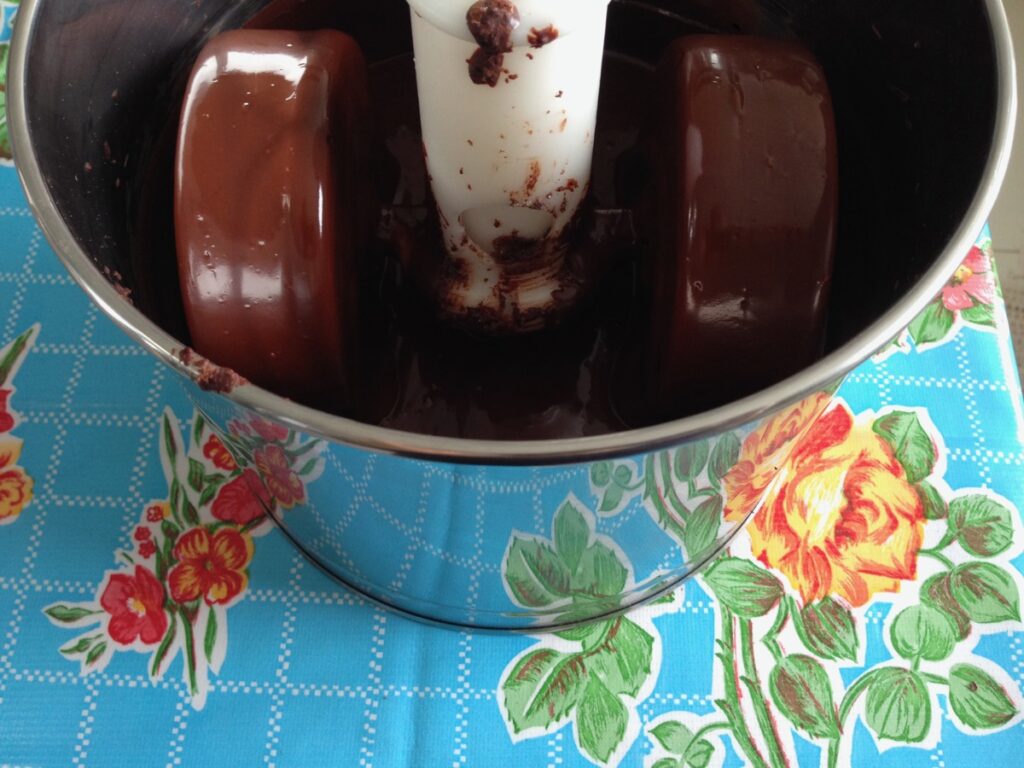
6. Pre-grind and fill the grinder. Pre-grinding your nibs is not necessary, sometimes I do it and sometimes I don’t. Adding the nibs to the grinder takes a lot longer if you do not pre-grind. You cannot add all the nibs at once, you have to put them in a bit at time over a few hours. You can pre-grind the nibs in a food processor, juicer, or molino (normally used for corn), a coffee mill, an açaí blender, a Vitamix, etc. If you own a metate, this would be a good time to bring it out. At this point I make sure I have my 700 grams of nibs. If I pre-ground, I can place all my, now called liquor, in my grinder. Let this grind for 24 hours then add the sugar. Final recipe goes until 48 hours. There are risks associated with letting the grinder run this long; the machine may get hot, the electricity may stop and your chocolate can harden, I have heard of machines catching fire – although mine never have. I let my machines run about 2-3 days without stopping but I am checking on them before I go to sleep and first thing in the morning, and several times during the day. You can grind this chocolate anywhere between 2 hours to 60 hours; grind time is determined by the chocolate maker. The more you grind, the smoother/creamier the chocolate will be. But, the longer you grind, the more flavors and aromas escape. Your chocolate will have a very strong flavor in the beginning, but as the hours pass, you will lose flavor and aromas. You are the chocolate maker and you have to decide when you want to stop the machine. Another thing to consider is that very long grind times, longer than 50 hours or so (using this type of machine), may produce gummy chocolate or chocolate with a sticky texture.
Loading the machine notes: if you have one of these baby grinders it is easy enough to place it in a warm area or oven (not to exceed 50C or 120F), and warm the stones for about 20 minutes. If your stones are cold and your nibs are cold, the machine may not grind the nibs, and this can harm your machine. You can also use a hair dryer to warm the stones and you can start with warm nibs. I place my nibs in an oven at 50C/120F, sometimes overnight, to speed up the time I take adding nibs to grinder. Always remember to add nibs slowly. It should take about an hour to load all your nibs into the grinder if you do not pre-grind them. If you are making a white or milk chocolate use the rule of adding ingredients into the machine in order of liquid state; so for a milk chocolate, first add the cocoa butter then the nibs, let them grind a few hours until it all becomes liquid, then add the sugar and milk powder at the same time. You always want to add dry ingredients into wet ingredients.
7. Sugar. I add 300 grams of sugar, 24 hours after I place the nibs into the grinder. I use organic cane sugar but you can use white refined sugar, raw sugar, coconut sugar, etc. As long as it has a low moisture content. Once I tried to use a type of dark brown sugar sold in the Americas called by different names; rapadura, piloncillo, or panela. The mix was sticky and unworkable. I even tried dehydrating the rapadura for 50 hours before adding and it was a disaster. You don’t have to add any sugar at all. You can make a 100% cacao bar. Or you can make a 95% bar and only add 50g of sugar. You get to decide. Just make sure the sugar is low in moisture. You can also place the sugar in a warm oven, about 50c (120F) for a few hours to decrease moisture in the sugar. Humidity in your sugar can affect the viscosity of you final chocolate.
The longer you allow it to grind, the more the chocolate releases aroma and the more the flavor of the chocolate changes. This is your chocolate. Stop it when you think it tastes great; 25 to 48 hours or grind time is good.
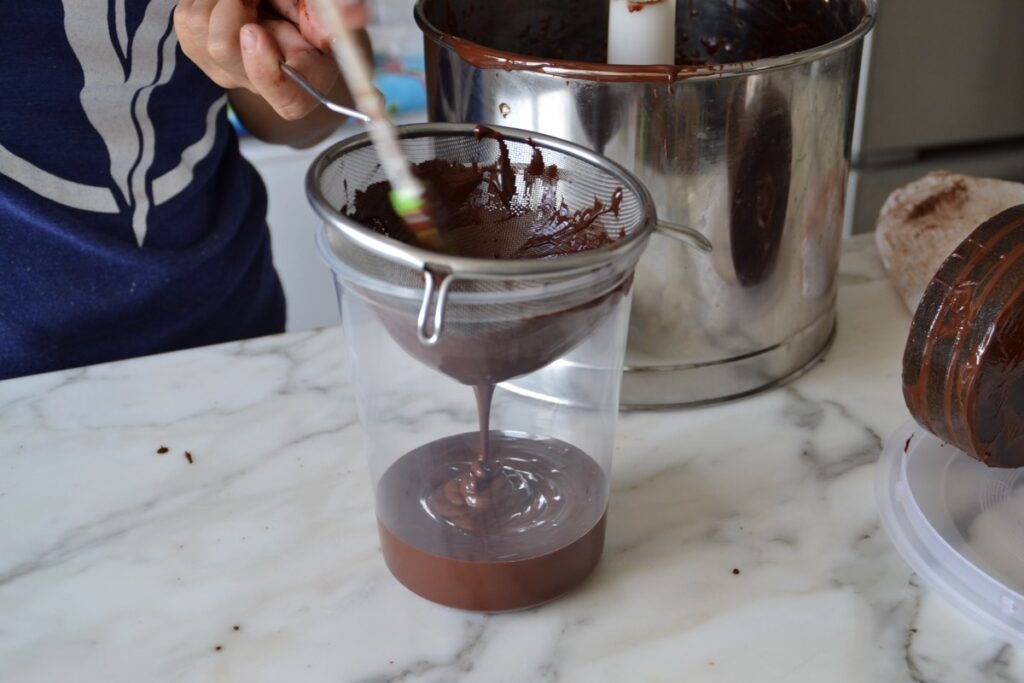
8. Removing chocolate from machine. Dump the chocolate into a container, through a sieve to catch any unground pieces. Make sure to label it. You can leave the chocolate like this forever. It will change flavors and color but it will always be edible. I like to put it in the fridge right away because it is easier for me to temper it later. Or if I am making a test batch of new beans and I don’t want to bother placing it in my molds, I pour it from the machine, through a sieve into a container then place all of it onto a baking sheet lined with silpat or wax paper and straight into the refrigerator for 20 minutes. It will not be perfectly tempered, but it’s good enough for me to taste and see if I want to work with this cacao in the future. I live in Brazil where daily temp is 32c (90f), if I left it on the shelf, it would stay liquid for weeks and the cocoa butter will separate to the top, there is nothing wrong with this, just means you have to temper it well before you use it. If you want to temper this correctly, go here: start tempering.
It is nice to wash your machine with warm water after every batch but it is normal to put another batch in the machine before washing it. I wash mine with warm water only, unless I made a milk chocolate or a chocolate with some spices, then I use a mild soap.
I think chocolate is best immediately after tempering it. But chocolate is edible years after tempering. The validity of chocolate depends on what you put in it. Only cacao and sugar is valid for a few years, I place 1 year validity on all my plain bars while other chocolate makers put 3 years. Note this is the validity date after you temper and package, not of when you made the chocolate.
Para informações sobre cursos bean to bar envia email para: arcelia@missionchocolate.com
I am teaching a ‘how to make chocolate’ course with Mestiço Chocolates in Sao Paulo, Brazil. Please email arcelia@missionchocolate.com for more information.
Best machines and tools for making small amounts of chocolate
Roasting
- small oven
- small convection oven
- small coffee roaster (If money is not a problem)
- Behmor 1600 Plus Customizable Drum Coffee Roaster (I have this as well)
- RK drums
- Selmi Cacao Roaster
- PackInt Roasting Machine
- Jafinox (Brazil)
Cracking
- Crankandstein
- Botini Coffee bean cracker (you can find these cheap in Brazil)
- Manual Grain Grinder (molino)
- Champion G5-NG-853S Household Juicer, White
- Jafinox (Brazil)
Winnowing
- Sylph Winnower (USA) This is what I use.
- Hair dryer
- Jafinox (Brazil)
Grinding
- premier chocolate refiner 110v 1.5L
- premier tilting chocolate refiner – Melanger
- ultra wet grinder Gold 2 Liter Table Top Wet Grinder with Atta Kneader, 110 Volt
- CocoaTown USA
- Vonin (Brazil)
- Indi Chocolate- refiners and parts
- Spectra Melanger moedor de cacau- BRASIL alex@planetacacau.com.br
- Jafinox (Brazil)
Tempering
- ChocoVision C116DELTA110V Revolation Delta Chocolate Tempering Machine. This is what I use.
- jb prince chocolate tempering machine P110 Tabletop
- Jafinox (Brazil)
Melters
- mol d’art chocolate warmer – 3 Kg – Made in Belgium. I have one of these; these are the best melters on the market.
Thermometer
- infrared thermometer (cheap option, not the best, I have 3 of them and they all read different temps)
- TEMPRA NON-CONTACT INFRARED THERMOMETER (The best but usually out of stock.
Micrometer
- iGaging 0-1″ Digital Electronic micrometer w/Large Display Inch/Metric. Measures the texture of your chocolate, started with this one but now just use my tongue to measure the creaminess.
Molds
- Tomric- USA
- Gramado Injetados– Brasil
Foil
Dehumidifier
Great books to learn about making chocolate:


Farms in Brazil that will sell small quantities:
- Fazenda Camboa- 100% organic- eduardo@ecarcons.com
- Fazenda Venturosa- jimlucas1940@gmail.com
- Fazenda Lajedo do Ouro- pedro.neto@lajedodoouro.com.br
Websites to learn about chocolate
- Chocoweb.com.br – Brasil
- TheChocolateLife.com – USA
- ChocolateAlchemy.com – USA
Where to buy cacao in the USA
- Meridien Cacao
- Chocolate Alchemy
- Ecom Cocoa Trading -ddomingo@ecomtrading.com, (646) 810-2132
- Letterpress Chocolate -david@letterpresschocolate.com
- Uncommon Cacao
How to temper bean-to-bar chocolate
To find out about my next chocolate making course email: arcelia@missionchocolate.com
Print
How to make bean-to-bar chocolate
- Total Time: 79 hours
- Yield: 1 kilo of chocolate 1x
Description
How to make chocolate from scratch. This recipe makes a dark chocolate of 70% cacao.
Ingredients
- 1000 grams of cocoa beans (or 700 grams of nibs)
- 300 grams of sugar
Instructions
- Roast cocoa beans to 130c for about 25-35 minutes
- Cool your beans for 6 hours
- Crack and winnow
- Place 700 grams of cocoa nibs in grinder and grind 24 hours. (pre heat grinder or add some hot air)
- Add 300 grams of sugar after 24 hours
- Grind for another 24 hours
- Remove from machine, through a sieve
Equipment
 Buy Now →
  Buy Now →
  Buy Now →
  Buy Now →
Jb prince chocolate tempering machine
Buy Now → Buy Now →
  Buy Now →
  Buy Now →
  Buy Now →
 Notes
Please read the entire post because the details matter. Let me know if you have any questions.
The list of equipment is if you are going to really get into chocolate making. If you want to do this at home, once in a while, with your kids, all you need is the Premier chocolate refiner. Everything else you can substitute for something you already have at home.
- Prep Time: 7 hours
- Cook Time: 3 days
- Category: chocolate
- Method: stone grinder